Custom Robot Workstations And Laser Systems Manufacturer



Installation & Maintenance Guide for Robotic Laser Welding Systems: A Practical Roadmap
Deciding to introduce a robotic laser welding system is a significant milestone in your automation journey. However, the initial purchase is just the beginning; ensuring consistent uptime and precision is what truly drives your Return on Investment (ROI).
For many manufacturers, the post-purchase phase can be daunting: How should the facility be prepared? How do you achieve the perfect weld seam? What is required to protect expensive optical components? This guide provides a professional roadmap for successful implementation, from site prep to advanced troubleshooting.
1. Professional Installation & Commissioning
A laser welding robot requires a much more controlled environment than traditional MIG/TIG stations to maintain its micron-level precision.
1.1 Facility Requirements & Utilities
- Structural Foundation: The robot must be anchored to a reinforced, level concrete floor. Any micro-vibration during high-speed movement can compromise the focal point of the laser.
- Stable Power Supply: Fiber laser sources are sensitive to voltage drops. We strongly recommend a dedicated industrial voltage stabilizer to prevent power fluctuations that cause inconsistent weld penetration.
- Controlled Environment (Cleanliness): Dust is the enemy of lasers. Even in a heavy industrial plant, the welding cell should be enclosed to prevent airborne particles from contaminating the laser welding head’s internal optics.
1.2 Critical Commissioning Steps
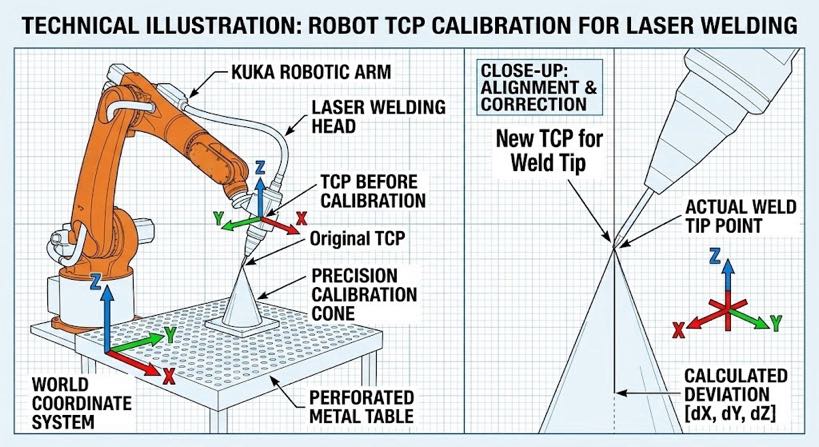
- TCP (Tool Center Point) Calibration: This is the most vital step. You must ensure the software’s coordinate system aligns perfectly with the laser’s physical focal point.
- Process Parameter Validation: Develop a “Recipe Library” for your specific materials by testing:
- Laser Power & Speed: For optimal penetration depth.
- Wobble Parameters: Adjusting frequency and amplitude for superior seam aesthetics.
- Sequence Optimization: To minimize thermal distortion in thin-walled parts.
2. Preventive Maintenance: Protecting the “Optical Heart”
The fiber laser source and optical path are the most valuable components. A disciplined maintenance schedule can extend the system’s operational life by several years.
2.1 Daily Inspection (The 5-Minute Rule)
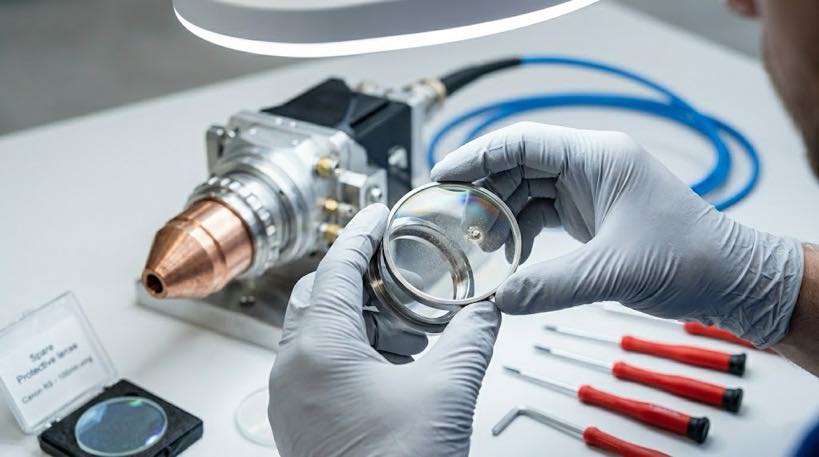
- Cover Slide (Protective Lens) Inspection: Before every shift, use a high-intensity light to check for “burn spots” or dust on the protective lens. Replacing a $20 lens immediately prevents a $5,000 collimating lens failure.
- Chiller Status: Verify water levels and ensure no condensation is forming on the laser head.
2.2 Periodic Maintenance Schedule
- Copper Nozzle Maintenance: Regularly clear spatter from the nozzle tip to ensure undisturbed shielding gas flow.
- Control Cabinet Airflow: Clean the intake filters of the robot controller to prevent overheating of the internal drive boards.
- Coolant Cycle: Replace the deionized water in the cooling system every 3 months to prevent scale buildup that hinders heat dissipation.
3. Robotic Laser Welding Troubleshooting
When production stalls, diagnosing the issue quickly is essential. Here are the top 3 common issues and their solutions:
Issue 1: Blackened Seams or Oxidation
- Root Cause: Poor gas shielding due to low flow rate, contaminated gas, or a leak in the line.
- SEO Fix: Check the pressure regulator (0.15–0.2MPa) and ensure the shielding gas (Argon/Nitrogen) is effectively covering the weld pool.
Issue 2: Sudden Loss of Weld Penetration
- Root Cause: A dirty protective lens is the most common culprit, followed by water temperature issues in the chiller.
- Action: Replace the cover slide. If the problem persists, ensure the water chiller is maintaining a stable 25°C; excessive heat causes laser power degradation.
Issue 3: Robot Motion Alarms (Path Deviation)
Root Cause: Communication lag or mechanical collision.
Action: Inspect EtherCAT or industrial bus cables for wear. Re-verify the fixture positioning to ensure the workpiece hasn’t shifted.
4. Training: The Key to Long-term Success
The most sophisticated automated welding system is only as good as its operator. We recommend training at least two technicians in “Laser Process Fundamentals.” An operator who can identify an aging lens before it fails will save your company thousands in unplanned downtime.
Maximizing Your Automation Asset
Successful robotic laser welding is a balance of precision hardware and disciplined operation. By following these installation and maintenance protocols, your factory will transform from manual labor to a high-output, high-precision manufacturing powerhouse.
Up Next in our Series:
Now that you are equipped with the knowledge of cost, ROI, and operation, how do you choose the right partner? Stay tuned for: “How to Select a Robotic Laser Welding Supplier: From Technical Assessment to Sample Testing.” We will provide a 5-point checklist to help you vet manufacturers and ensure you get the best after-sales support in the industry!
Author Identification
An expert in robotic welding system integration with over 12 years of industry experience. My company has over 26 years of professional experience, holds more than 40 patented technologies, and has successfully completed over 1,500 projects worldwide (approximately 70% of which involved robotic welding cells, totaling more than 1,000 units). The company holds EU CE certification (Certificate No.: M.2026.206.C134866) and complies with the EN 60204-1:2018 and EN ISO 12100:2010 standards. I have assisted numerous manufacturing companies throughout the entire process of robotic welding workstation implementation, from selection to production launch.
Updated: May 2026
RELATED POSTS
No-Programming Robotic Welding Cell:How Vision-Guided Systems Eliminate Teach Pendants
Robotic Laser Welding ROI Analysis: Is It Worth the Investment?
7th Axis Robot vs Traditional Gantry: Which Is Better for Your Welding or Material Handling Line?
Real-World Robotic Welding Cell Applications in General Industry: Case Studies 2026
Robotic Welding Cell vs Traditional Welding Line: What Actually Changes on Your Shop Floor